Events and Tickets
This guide covers attendee and organiser workflows, with emphasis on event-day reliability.
Event Lifecycle (Organiser)
1. Draft
- Create event with the right setup mode, schedule, visibility, ticketing, attendance, chat, and image choices.
- Configure ticket types, ticket access, and buyer limits when the event uses tickets.
- Attach required forms and publish versions.
- Assign event staff roles and permissions.
2. Publish
- Publish only when event details and policy are final.
- Once sales begin, date/time edits should be deliberate and minimal.
- Visibility and access settings control discoverability and checkout behaviour.
3. Operate
- Use event admin tabs for
Event Day,Scan,Chat, tickets, staff, and updates. Event Dayis the main live roster workspace during an active event and relabels toAttendance recordsafter the event.Scanonly appears when the event attendance registration allows QR validation.- When scanning is enabled, treat
Scanneras the main door tool andEvent Dayas the broader oversight and records workspace. - If attendance registration is off,
Event Daystays available as a read-only roster andScanis hidden. - Scanner and readiness checks are canonical and enforce required-form completion.
- Use overrides only when policy and permissions allow.
- The scanner stays open for 4 hours after the event end time so late arrivals can still be scanned in. A banner shows while this grace window is active, and the scanner reads as closed once it passes.
- On a multi-date event,
Event Dayscopes to one scheduled entry at a time, with a selector to switch. Desk check-in enforces the same safety gates as QR scanning.
Event Staff Setup
- Start with reusable staff roles for stable bundles like
Door Team,Incidents, orStage. - On a multi-date event, each staff invitation carries the event dates it covers, and access follows what the person accepted. See Staff dates on multi-date events.
- If one person needs an exception for one event, use
Customise accesson that staff assignment instead of creating another role. - Sensitive permissions such as
Verify MembersandOverride Required Ticket Docscan only be granted by owners/admins. - If you later remove the exception, reset the assignment back to
Role defaults.
4. Close
- Post final updates where needed.
- Review attendance and incident outcomes.
- Resolve refund/void actions deliberately.
- After the end time, home keeps a
Wrap upentry for organisers for 7 days, and aJust endedentry for ticket holders and staff for 48 hours, so the event stays reachable while you close it out. - Anyone still on a waitlist when the event ends is closed out automatically.
- When you want responses, publish the feedback form and then request feedback as a separate, deliberate step. The request confirms its audience with a live recipient count.
- Archive operationally complete events.
Create Event Options
Use Create event when you want to set up a gathering and decide what Hubbaly should do for it
from the start. You can keep the first version simple, then finish specialist setup from the event
admin pages later.
Core Details
Nameis the public event title. Keep it clear enough for members to recognise in tickets, emails, calendars, and event lists.- Ticketed events show one compact
Date and timesummary here. SelectSet scheduleto open a focused setup task withStructure,Dates, andReviewstages. A wide dialog is used on desktop and the task fills the screen on a phone, keeping Back, Close, and the main action in stable places. - You can Close schedule setup without clearing either the event form or the schedule draft. Select
Resumeto return to the exact stage and values. Browser Back moves through schedule stages before Hubbaly asks whether to leave a form with meaningful unsaved work. - Select
Use scheduleafter reviewing the dates. Only then is that schedule ready forCreate Event. If you reopen a completed schedule and make edits, finish them or discard them; Hubbaly will not silently submit a half-edited version. Collect interest firstcan keep its tentative start and end blank while the date is being worked out.No tickets for this eventuses one continuous start and end because it does not use the separate ticket schedule.Descriptionshould explain what the event is, who it is for, and anything people should know before they register or turn up.Locationis optional at creation. Add it when the venue or address is known; collect-interest events can stay location TBC.- Create event keeps capacity decisions out of the first form. Set an event-wide sales cap from Event Admin -> Tickets only when all ticket types should share one sell-out limit.
Event Setup
This is the choice that changes how the rest of the form behaves.
Tickets available nowcreates a ticketed event. Use it when people should claim or buy a place, receive a ticket, and potentially show a QR code at check-in. This mode requires a start time and an end time before the event can be created.Collect interest firstcreates an event page for demand-gathering before the date, venue, or tickets are final. People can register interest, but that does not reserve a place or guarantee tickets. Use this for early announcements, wait-and-see venues, or events where you want to email interested people when tickets go on sale.- Event-specific interest questions appear on the public
Register interestform before the person submits. Use them only for one-off answers needed for this event’s interest list. Put reusable details such as full name or phone number inHub -> Admin -> Advanced features -> Details to collectinstead. No tickets for this eventcreates an event without ticket claiming or checkout. Use it when people can simply attend, or when organisers only need a page, updates, chat, and manual attendance. QR ticket validation is not available in this mode.
Visibility and Discoverability
Hub onlykeeps the event inside the hub experience. This is best for private member gatherings or events that should not have a public share page.Public listedgives the event a public event page and makes it eligible for public sharing and discovery surfaces. Public visibility does not automatically mean anyone can get tickets; ticket access is a separate choice.Private, invite onlyhides the event from hub members too. It stays out of discovery, lists, search, and shared surfaces; only invited people and authorised organisers can see it, and anyone else with the link sees “not found” rather than confirmation that the event exists.Show attendee list on the event pagecontrols whether visitors can see who is attending. Leave it off for more private or sensitive events.
Ticket Access
These choices appear when Tickets available now is selected.
Members onlymeans only hub members can claim tickets. Extra tickets must be assigned to active hub members during checkout, and each member can hold one active ticket for the event.Members plus guest ticketslets members reserve tickets for guests without naming every person straight away. Use it for private events where members may bring someone with them.Publiclets anyone claim tickets when the event is alsoPublic listed. This is the mode that enables public guest checkout for signed-out buyers.Buyer caplimits how many tickets one buyer can hold for the event. Leave it blank if there is no per-buyer limit.
Attendance Registration
This decides how Hubbaly should count attendance.
QR scan plus manual check-inis for ticketed events where door validation matters. Staff can scan tickets and still use manual check-in when needed.Manual check-in onlykeeps attendance as a staff action in Event Day, without QR scanning.Check-in optionalis for ticketed events where holding a ticket usually counts as attended, but Scanner and Event Day should still be available.Offmeans Hubbaly will not register attendance for this event. Use it when attendance records are not needed.
Event Chat and Images
Create initial event channelscreates useful event channels at the same time as the event. You can start with ticket-holder and staff channels, choose the membership behavior for each channel, then adjust chat in Event Admin after creation.Flyer or artworkis optional. Upload a clear square image if you already have one; otherwise you can add or replace event images after the event record exists.
Register Interest Events
Collect interest first events gather demand before the date, venue, or tickets are final. This
section explains who gets emailed and when, and how to move the event to tickets without losing
the interest list.
How People Join the Interest List
- Logged-in people register instantly from the event page. They do not receive a confirmation
email and count as
activestraight away. - Email-only visitors get a confirmation email first. Their registration stays
pendinguntil they click the confirmation link, which is valid for 7 days. Submitting the form again within 10 minutes does not send another email. - Registering interest never reserves a place or guarantees tickets, and it does not add the person to your hub. The interest list stays separate from tickets sold, the waitlist, attendance, and hub membership.
- The confirmation email includes a manage link (valid for 180 days) so email-only registrants can cancel themselves later. Logged-in people register without one and cancel from the event page instead.
When Interested People Get Emailed
Nothing is emailed automatically while you collect interest or when you change event settings. The full set of emails an interested person can receive:
- Confirmation email: sent immediately on sign-up, but only for email-only registrations (see above).
- Updates you compose: send one whenever you have news.
Compose email updateon theInteresttab andTicket setupalways opens Email Studio with theRegistered Interestaudience preselected; onlyactiveregistrations receive it, duplicates are removed, and unsubscribes are respected.Open Email StudioonCommunicationspreselects this audience only while the event is still collecting interest; after the move to tickets it defaults to ticket holders, so check the audience there before sending. - Tickets-on-sale alert: a one-time launch email, sent only when an organiser presses
Send tickets-on-sale alertonTicket setup. Switching the event mode by itself does not email anyone. - Event change notifications: when you save edits that affect attendees, the edit flow asks who to notify. You can choose ticket holders, interested people, hub members, or nobody.
Moving from Interest to Tickets
- Finalise the date, time, and venue, then update the event details.
- Open
Edit Eventand switch the event setup toTickets available now. The interest list and its history stay attached to the event. - Create at least one ticket type on
Ticket setup. For paid tickets, finish Stripe payment setup first. - When tickets are actually buyable, press
Send tickets-on-sale alertonTicket setup.
The alert only sends when the event is published, in tickets-available mode, has a valid start and end time, and has at least one active ticket type people can buy right now (sales window open, inventory remaining, paid setup complete). If something is missing, the page explains what to fix instead of sending.
The alert sends once per event. People who unsubscribed, opted out, or disabled these
notifications are skipped. Afterwards Ticket setup shows when it was sent, who sent it, and how
many people were reachable or skipped, so the whole team can see it is done.
Managing the Interest List
- The
Interesttab in event admin shows the roster withactive,pending, andcanceledcounts. Managers see masked email addresses; owners and admins see full contact details and can useExport CSV. - Answers to interest questions from the
Register interestform appear underEvent answerson the same tab once the registration is active. - Hub-level demand across events lives in
Hub -> Admin -> Insights.
Post-Event Reports
Use Event -> Admin -> Reports after the event ends.
Operational Debriefis the organiser closeout view for attendance, arrival timing, staff turnout, incidents, and follow-up items.Finance & reconciliationis the event-only settlement view for gross sales, refunds, disputes, Hubbaly fee, Stripe processing, original organiser net, final organiser net, and reconciliation anomalies.- Use the drilldown links instead of exporting people-level attendance data from this workspace.
Event Day,Staff, andIncidentsstay the canonical detail pages. Export finance spreadsheetstays finance-only and summary-led. It does not include the attendance roster or per-person check-in times.Download PDFdownloads a branded, print-ready report with executive summary, operational debrief (including the named staff no-shows and open and resolved incident numbers), finance and reconciliation, and action items.- The post-event email is a shorter combined summary. Use it as the inbox handoff, then open the reports workspace for full detail.
- If the event had paid orders and payments are ready, the finance view can hand you into Stripe with
Manage in Stripe. If setup still needs work, the finance view will point you to the right hub payments action instead. - The report opens with a
Wrap upcard: thank your attendees, share the photos, and quick rows for open incidents or returns when there are any. - Two charts sit under the overview numbers: an
Arrival Curveof check-ins across the door window, and aSales Paceline against capacity. Both appear in the PDF export. - Refunds are split by who or what issued them, with a list of every refund and its source, and a
Waitlist and Returnssection shows joined, invited, bought through the waitlist, invites expired, still waiting at close, and returned seats passed on to new holders. The same lines appear in the finance spreadsheet. - The overview shows check-ins as a percentage of tickets.
- The entry section reports only what recorded evidence supports: a reconciling
No Recorded Check-Inbreakdown (not a blocked-attendees guess), with document state frozen once the door window closes while late check-ins still count.
Understanding your event finances
Every figure in your event and hub finance comes from the same money trail. Here is what each part means.
- Gross sales: what buyers paid before anything is taken off.
- Hubbaly fee and card processing: our platform fee and Stripe’s card fee. On Connect direct-charge events these come out of your payout; the finance breakdown always shows them.
- Original organiser net: gross minus those fees, before any refunds.
- Refunds: money returned to the original payer. A refund can come from three places, and each order’s detail page names which: a buyer’s return filled by a replacement buyer (automatic), a refund you issued yourself (manual, with the policy you chose), or one issued directly in Stripe.
- Absorbed refund fees: when you fully refund under the cancellation policy you cover the fees that were already taken; this line is what that cost you.
- Final organiser net: what you actually keep, which is original net minus refunds and lost disputes, plus any fee credits.
Refund policies and who pays the fees:
- Standard policy returns the ticket price minus the fees already spent, so the buyer bears those fees.
- Full cancellation returns the whole ticket price and you cover the fees, which then show as absorbed refund fees.
- A return that resells settles only once a replacement buyer is found; the original buyer is refunded from that sale.
Payouts and a negative available balance:
- Available balance can read negative for a short while when refunds went out before recent sales have settled. The pending amount arrives with your next payout and clears it. It is a timing gap, not a loss.
Data health:
- The data health checks confirm every order’s payment records arrived from Stripe so your report is audit-grade. They do not affect your balance. If something needs attention, use
Sync Stripe ledgerfrom the finance view.
To see the full story of one order, with payment, fees, and every refund named by who and when, open it from the Orders list or the finance report and read its money timeline.
Hub Finance
Use Hub Admin -> Finance for hub-wide money, payouts, refunds, disputes, and reconciliation.
- Hub Finance is the hub-level view for orders, refunds, payout history, and open dispute tracking across events.
- The summary highlights
Gross sales,Final organiser net,Available balance, andPaid outtotals; a secondary strip breaks outPlatform fee,Card processing,Original organiser net,Refunded, andOpen disputes. - Open disputes surface as an alert banner above the hero stats while any remain open, with amount, reason, evidence deadline, and event context where Hubbaly can map the dispute back to an event.
- The payouts section links back to Stripe for full payout detail and still shows recorded payout history if the live Stripe read is temporarily unavailable.
- Each event card expands to show
Gross,Platform fee,Card processing,Original organiser net,Final organiser net,Refunded, and ticket-type revenue rows. - Use the
Export CSVaction in the page header for date-scoped finance CSVs, and use each event row for attendee export without exposing attendee email addresses. - Use
Finance Digest Emailson the finance page to chooseOff,Daily,Weekdays only, orWeekly(Monday at the chosen local time), set the local send time/timezone, and add finance recipients beyond the owner. - Scheduled digests are suppressed automatically when the reporting window has no meaningful finance activity, so Hubbaly does not send zero-activity summary email.
- Critical finance alerts stay immediate for payout failures, Stripe capability issues, disputes, and reconciliation problems even if scheduled digests are off.
- Event admin
Ticketsstays focused on event setup and live operations. - Event ticket pages now show recent orders and recent sold tickets only, with drill-down pages for full browsing/search.
Paid Ticket Readiness
Check Hub -> Admin -> Settings -> Payments before publishing or changing live paid tickets.
Fully readymeans the hub can take payments and the platform checkout path is active for that hub.Connected, rollout not activemeans the hub has a connected account, but this hub can still use legacy paid checkout until Connect rollout is active for it.Platform setup incompleteorNeeds reviewmeans do not treat paid-ticket setup as healthy yet. The hub may be connected, but the platform checkout path or recent sale evidence does not match the expected Connect route.- This is not determined by old event versus new event alone. Hub rollout policy and the checkout path used at sale time matter more.
- If a newly sold paid ticket later shows
0 Hubbaly fee / 0 Stripe feein Event Admin refunds, pause and review payments setup before more sales. That usually indicates legacy routing or incomplete platform paid-ticket readiness rather than a harmless display mismatch. - Draft events can still keep paid ticket types saved while setup is incomplete, but publishing or changing live paid tickets is blocked until the required readiness checks pass.
Event Admin Settings
Use Event -> Admin -> Settings to control the event rules before people arrive.
Event Admin Settings Basic Info
Set the event name, description, and date/time carefully.
- Keep major date/time changes deliberate once tickets are live.
- Add enough description for attendees and staff to understand the event quickly.
- Treat this as the source of truth for what the event is and when it happens.
Event Admin Settings Location
Use this to set the venue name and address the team should rely on.
- Make sure the location is accurate before publishing.
- Keep it consistent with any email or update copy you send later.
Event Admin Settings Images
Use event images for the event page, admin context, and outbound communications.
- Upload clear artwork that still makes sense on mobile.
- Replace test artwork before the event is public.
Event Admin Settings Visibility
This decides whether the event is hub-only, public, or private.
Hub Onlykeeps discovery and checkout inside the hub.Publicallows direct-link viewing and public ticket access where policy allows.Private, invite onlyhides the event from everyone except invited people and authorised organisers. It never appears in discovery, lists, or search, and an uninvited visitor with the link sees “not found”. Invite people through the event’s invitations; on a ticketed private event, purchase invites carry the access.- Waitlists and ticket returns are not available on private events: sell-out recovery needs an open audience, so setup shows this as unavailable rather than offering switches that cannot work.
- Public events with active tickets cannot be switched back to
Hub Onlyuntil active ticket count returns to zero. - Review this alongside ticket eligibility so the public/private behaviour stays consistent.
- Public event pages can show hub context, but they only link back to the hub overview when the hub itself is public.
- Public event pages can reuse the hub banner only when the hub is public. Private hub banners are not reused on public event surfaces.
Public Event Pages, Search, and Sharing
Treat public event visibility and public ticket access as related but separate decisions.
- Only
Publicevents get a real public event page that you can share outside the hub. Hub Onlyevents do not have a public event page, so they are not intended for normal public discovery or search results.- An event can still have a public event page even if tickets are members-only. That page can explain the event publicly while keeping buying restricted to eligible members.
- Appearing in search results is not immediate or guaranteed. The main requirement on your side is that the event actually has a public event page and clear public-facing details.
- Use a stable event slug, a clear event title, and a short description that explains what the event is and why someone should care before they click through.
When someone shares a public event link, the preview usually comes from the event’s public metadata.
- The social sharing card typically uses the event title, description, and a main image.
- If an event flyer is available, that is usually the strongest image for the social sharing card. If not, Hubbaly can fall back to other event artwork.
- Choose artwork that still reads well in a wide preview crop and does not rely on tiny edge text.
- Review public event details before sharing widely, because the card preview often becomes the first impression people see in messages and social feeds.
Event Admin Settings Tickets and Access
Use this section to decide whether tickets are required and who can get them.
- Turn ticketing on only when the event really needs controlled entry, reservations, checkout, or QR access.
- Event-wide sales caps live in Event Admin -> Tickets, not here. Set one only when all ticket types should share a single sell-out limit.
- Choose whether tickets are member-only, member-plus-guest, or public.
Members only: only hub members can buy, ticket 1 stays with the buyer, and every extra ticket must be assigned to an active hub member during checkout.Members + guests: only hub members can start checkout, but extra tickets do not all need a designated member up front. Assign existing members during checkout if you already know them; any extra tickets you leave unassigned stay on the buyer account for now so you can reserve places for guests without naming them first.Public: anyone can buy when the event is public-listed. This is the only mode that enables the separate guest-checkout flow for signed-out buyers.- For members-only ticket types on a public event, Hubbaly shows the ticket publicly as reserved for hub members with sign-in and join guidance, so visitors can see the ticket name and price. Active hub members can still buy it from the normal event page.
- Paid ticket types can stay saved while the event is still in draft, but once the event is live Hubbaly requires both hub payment capability and platform paid-ticket readiness before paid sales continue.
- Keep ticket type names short and recognisable. Hubbaly caps ticket type names at 100 characters so names fit admin feedback, checkout, emails, and payment-provider records.
Event resources (FAQ, notes, links, files)
Manage event-facing resources in Event Admin -> Documents -> Event resources. This tab covers
practical details that do not belong in the main event description.
Good examples:
- Arrival time, parking, transit, and meeting-point notes.
- Accessibility details and what to bring.
- Private joining instructions for ticket holders.
- Short FAQs such as “Can I bring a guest?” or “What happens if it rains?”
- Downloadable PDFs/images such as floor plans, schedules, and waiver readables.
- External links to maps, partner pages, or supporting docs.
Each resource has its own visibility:
- Everyone: visible to anyone who can view the event page.
- Members & ticket holders: visible to hub members and active ticket holders.
- Ticket holders only: visible only to people with an active ticket for this event.
File limits: PDF, JPEG, PNG, WebP, GIF up to 25 MB. Downloads are access-checked: a denied download returns 404 (privacy boundary) instead of revealing that a private file exists.
Attendee documents/waivers and post-event feedback forms continue to live in their own tabs in the same workspace.
Event Admin Settings Attendance Registration
This controls how Hubbaly registers attendance for the event.
- Use QR scanning when entry validation matters.
- Use manual-only when you want Event Day to be the check-in tool.
- Keep the attendee list visible only if that suits the event privacy posture.
- Ticket QR visibility is platform-managed. Hubbaly shows attendee QR codes 24 hours before the event starts, and there is no per-event timing setting in v1.
Event Admin Settings Personal Statuses
Personal event statuses let attendees say what they are hoping to get out of an event, with a short note and an optional photo. It is a flexible way to signal intentions and interests ahead of the day, for example:
- Key interests or topics to explore at a meetup or conference.
- Whether you are open to chatting and meeting new people.
- What you are looking for on the night, such as dancing buddies at a club night.
How it works:
- Statuses are private to the event. Only fellow attendees, the event host, and hub admins can see them; they are never shown publicly.
- Turn
Personal event statuseson or off in theAttendance registrationsection ofEvent -> Admin -> Settings. Hubs choose whether the feature is on by default for new events. - Attendees add or edit their own status from the event’s attendees page, where it appears alongside the guest list, and it keeps working even when the attendee list is hidden.
- Organisers can clear an attendee’s status if needed; clearing removes it for everyone.
Event Admin Settings Chat
This section is informational only. Event chat is channel-first now.
- Use
Event -> Admin -> Chatto manage the actual event channels: create channels, rename them, disable them, and restore them later if needed. /chatcan also create an event channel now. Start from the main chat page, chooseEvent channel, then pick the event you manage.- If an event has no active event channels, the event page simply does not show event chat until an organiser creates the first one.
Ticket holdersgives access to anyone with an active ticket for the event, including people using the same Hubbaly account to hold a ticket without being hub members.Ticket holders who are membersis useful when the event is public but the chat should stay inside the hub membership boundary.Staffis for event staff coordination.Verified attendees (after check-in)is a later/additional channel option for post-attendance discussion. It only becomes relevant after attendance has been confirmed by scanning a ticket or marking someone attended manually.- Name the channel for the job people will recognise, then let the audience preset control who can get in.
- Use event updates for organiser announcements. Event chat no longer includes a separate event announcements channel.
- Use
Event -> Admin -> Documentsto manage required forms.
Event Admin Actions and Danger Zone
These are operator-only actions with wider impact.
- Duplicating is useful for recurring formats. Documents, settings, and images copy; staff assignments do not, so invite staff to the new event deliberately.
- Delete/archive actions should only be used when you are sure the event should no longer exist in its current state.
- Pause before any destructive change once staff, tickets, or attendees exist.
Ticket Lifecycle (Attendee)
- Discover an event.
- Select ticket type and quantity.
- Complete checkout (or free/comp flow).
- Open ticket in My Tickets or from the secure hosted ticket link sent by email.
- Complete required forms before arrival.
- Present QR at check-in.
Additional ticket access notes:
- Signed-in ticket holders use My Tickets and the ticket detail page as the main source of truth, including the ticket links sent in purchase confirmations and reminder emails.
- Placeholder or email-only ticket holders can use the secure hosted ticket link sent in purchase confirmations and reminder emails.
- The scannable QR appears 24 hours before the event starts. Before that, ticket surfaces show the readiness state/countdown instead of the QR itself.
- If required forms are still incomplete, the ticket surface sends the holder into the guest-consent flow and then returns them to the ticket afterward.
- If you lose a guest/email ticket message, use Find my ticket. Recovery emails send signed-in holders back to My Tickets and send email-only holders fresh hosted ticket links for upcoming active events.
- If a hosted ticket link has expired or no longer works, use Find my ticket to request a fresh access email.
- Hosted guest-ticket surfaces also offer
Email me a sign-in linkas the primary account-claim path, withCreate password insteadas the secondary option.
Offline access and installing the app
Hubbaly keeps working at the door even when the venue signal drops, as long as you open things before you lose connection.
- Once a page such as My Tickets or a ticket has loaded while online, it keeps showing the last saved copy offline, with a
saved X agonote, instead of an error. A brand-new page load still needs a connection, so open your ticket before you reach the entrance rather than in the queue. - The scannable QR appears within 24 hours of the event. Load the ticket once inside that window and it stays presentable offline.
- You can install Hubbaly to your home screen from your browser (
Install app/Add to Home Screen, or the in-app prompt when it appears) for faster, more reliable access on the day. The installed app is the same Hubbaly, not a separate app-store download.
Guest Checkout
Use guest checkout when a public event allows account-free purchase.
- Guest checkout only appears on published public-listed events with
Publicticket access.Members onlyticket types still require a signed-in eligible member. - The guest form is email-first. Buyers enter an email address and can optionally add a name before selecting quantities.
- If that email already belongs to a real Hubbaly account, guest checkout is blocked on purpose. Sign in with that email instead so the tickets attach to the existing account.
- If you already have or want a Hubbaly account, use the
Log inorCreate accountlinks on the guest-checkout page before paying. Hubbaly keeps your email and selected ticket quantities when it hands you into auth. - Free guest checkout confirms immediately on the page and by email.
- Paid guest checkout goes through Stripe, then returns to a guest-friendly processing screen that verifies the payment and hands off to ticket access without assuming you are signed in.
- If you close or cancel out of Stripe before paying, Hubbaly returns you to guest checkout with your current guest details and ticket selections preserved.
- Guest purchasers are sent a secure hosted ticket link in purchase confirmations and reminder emails. Hubbaly does not send the raw scannable QR directly in the email body.
- The hosted ticket page is read-only. It shows ticket details, readiness state, required-form status, and then the QR itself once the 24-hour activation window opens.
- If required forms are still outstanding, the hosted ticket page sends the holder into the guest-consent flow and then safely returns them to the same ticket page afterward.
Find my ticketappears only on guest-relevant surfaces: auth pages, guest success / hosted ticket flows, and public event pages where guest checkout is actually available.- Recovery is email-only and privacy-preserving. Hubbaly always shows the same success state, then emails either My Tickets or secure hosted ticket links for upcoming active events tied to that email.
- Guest holders can claim tickets into a full account from the hosted ticket page or guest-completion flows.
Email me a sign-in linkis the fastest path;Create password insteadstays available if you want a normal password login immediately. - About 24 hours before the event, guest/email-only holders get one state-aware reminder email: either the QR is ready, or required forms still need to be completed before the QR becomes available.
- Creating an account later with the same email upgrades the placeholder guest account and keeps those tickets/purchases attached to the new real account automatically.
Public Event Albums
- Public event pages can show event-linked public albums.
- Album cards open the specific album directly.
- The broader
View all public albumshandoff is only shown when the hub itself is public.
Ticket Types
Ticket types let you shape how people book:
- Create different offers such as General Admission, VIP, free entry, guest list, or staff tickets.
- Choose the price, how many are available, whether they count toward the event sales cap, and who can buy them.
- Ticket prices can be free, or at least
£1.00for paid entry. - Use Members Only when a ticket should only be available to hub members.
- Use a sales window if you want sales to start later or stop before the event begins.
- Turn a ticket type off by making it inactive instead of deleting it when you want to pause sales.
Ticket schedule: dates, times and ticket coverage
Hubbaly keeps three ideas separate so a retreat, theatre run, weekly course and festival can all use the same truthful model:
- The overall event span is the earliest start and latest end shown in event headers and lists.
- Dates or times are explicit attendance windows used when access, capacity, price, check-in, staffing or reporting differs within the event.
- Ticket coverage says which of those windows each ticket type admits.
Words such as festival, course or showing are examples, not stored event types. One event can legitimately sell a whole-event pass, a fixed weekend pass and separate day tickets together.
Set up the dates
When creating a ticketed event, answer How does this event run?
- Choose One continuous period for one start and end, including a retreat that runs across several days without separate access windows.
- Choose Separate dates or times when people, capacity, prices, staffing or check-in differ by date or part. Start with Consecutive days, Repeating dates, or Add dates myself.
The chosen helper creates ordinary, editable rows. Preview the dates, then review every start and end before saving. The pattern is not stored. Each row may have an optional label and capacity; an unlabelled row is shown by its full date and time rather than a made-up Day number.
- All controls use Europe/London time. A spring clock-gap time must be changed, and an autumn repeated-hour time asks whether you mean the earlier or later occurrence.
- Overnight generated rows require Ends next day. Manual row editing always shows both dates.
- Exact duplicate start/end windows block saving. Overlaps show a warning but remain allowed because two legitimate sessions may run at once.
- Initial separate setup needs at least two rows. An existing schedule may later have one row left.
In Event Admin -> Tickets -> Ticket schedule, expand any existing date to edit its label, time or capacity. Add dates uses the same helpers and appends without deleting current rows. Changing how dates are added never changes the saved schedule by itself. Dates are kept in chronological order; there is no separate manual display order.
What happens to people who already bought a ticket:
- Existing tickets, and any ticket type left as Whole event, admit every scheduled entry. Adding entries never takes anything away from current holders; they can attend whichever entries the event now runs.
- A ticket type is only tied to specific entries when it is set to Attendee chooses one (the buyer picks one inside that ticket card) or Selected parts (a pass for the entries you select).
- Once a ticket type has any activity (a sale, a checkout reservation, a purchase invite, a waitlist entry or a ticket-return offer), its admission mode cannot change and its entries cannot be narrowed. To sell a different admission model after sales have started, create a new ticket type instead.
Per-entry pricing and admission:
- On each ticket type, What does this ticket include? sets the admission mode. Whole event covers every saved date. Attendee chooses one lets you choose eligible dates and an optional price for each one, such as a cheaper matinee. Selected parts is one pass price covering the fixed dates you choose.
How buyers choose
- The date summary and date chips near the event title are informational. They do not select a ticket date and do not act as disguised links to the ticket list.
- Ticket types come first. Whole event and Selected parts state what they cover and need no buyer date control.
- An Attendee chooses one card shows its own Choose a date for this ticket control. The buyer must choose an eligible date before increasing its quantity, joining that ticket’s waitlist or continuing.
- Two different attendee-choice ticket types can hold different date choices in the same basket. Quantity applies to the date chosen for that one ticket line. Buying the same ticket type for two dates requires two checkouts.
- Choices survive supported sign-in, hub joining, terms, waitlist, returned-seat and browser Back journeys. If a date ended or became unavailable while the buyer was away, Hubbaly removes it, explains what changed and asks for a current choice. Checkout still performs the final server-side validation.
- Ended dates remain visible in coverage but cannot be newly selected. Sold-out dates can be selected only when the buyer can join that date’s waitlist or has a held/returned place. Low-stock and held-place messages appear on the relevant date.
Removing an entry, and going back to one event:
- You can remove an entry while only Whole event tickets cover it and it has no activity of its own.
- An entry cannot be removed once tickets are tied to it or it carries attendance history. Refund or move those first.
- The final remaining entry has no ordinary remove control. To collapse a schedule back to one continuous event, use Use one continuous event: it asks for a start and end and returns every ticket type to Whole event. This is blocked if any entry still has sold tickets or attendance history.
- A schedule can legitimately keep a single remaining entry (for example after removing an unsold showing). It stays a schedule and is not silently turned back into a single-date event.
A cancelled entry: there is no dedicated cancellation flow yet. To close ordinary availability for an entry you intend to cancel, set its capacity to 0. The capacity change is rejected if sold tickets, in-progress checkout reservations or released waitlist holds already commit places. Setting capacity to 0 does not itself close open ticket-return or waitlist offers, so buyers may still be able to book a returned place while an offer remains. Resolve those offers too. Buyers then see that entry as Sold out, not Cancelled. Communicate with existing holders and resolve their tickets using the normal refund, void and messaging tools.
Derived dates: while a schedule exists, the event’s start and end come from the earliest entry start and latest entry end. Event Admin -> Settings shows that range read-only and links back here; edit the schedule entries to change the dates.
On a published event: changing the schedule can shift the event’s dates, so you are asked whether to notify ticket holders before the change is saved.
How dates show for buyers and holders:
- Event lists, Home, Discover, and the event page all describe the schedule as one truthful run, and the event page adds a non-interactive dates strip.
- The event’s calendar download adds one calendar entry per scheduled date, not a single block spanning the whole run.
- Confirmation-email calendar links match what was bought: the chosen entry for Attendee chooses one, the covered days for Selected parts, the first upcoming date for a whole-event ticket.
- Reminder, purchase-invite, confirmation, and announcement emails name the dates for what each person holds. When a date cannot be stated with confidence, the email leaves it out rather than guessing.
Purchase invites (invite-only tickets)
Use an invite-only ticket type when a ticket should only be buyable through a private link you send, not listed on the public or member ticket page.
Making a ticket type invite-only
- On the ticket type, tick
Only available by invite. Invite-only types are hidden from the public and member ticket lists, from guest checkout info, and from search; only someone with a valid invite can buy. - The event’s normal rules still apply to invited buyers: membership (for members-only events), the sales window, and the sales cap. An invite never lets someone past a sold-out or closed sale.
Sending an invite
- From
Event Admin -> Tickets, open the invite-only ticket type and chooseInvite. - Add one or more recipient email addresses, a default and maximum quantity per person, an optional expiry date, and an optional message.
- Each recipient gets a private purchase link by email. Recipients who already have a Hubbaly account also get an in-app alert.
- A recipient can never take more than the invite’s maximum.
Invites for events with multiple times
- Whole event, or Selected parts (a pass): the invite works with no extra choice. The link admits the recipient to the entries the ticket covers.
- Attendee chooses one (one entry): when you send the invite you also pick which entry it is for. The invite is locked to that entry and its price, so the recipient is not asked to choose a different one. The entry is shown on the invite email, on the recipient’s page, and in your invite list.
How recipients buy
- Public events with guest checkout on: a signed-out recipient can buy as a guest with the invited email address.
- Members-only events: the recipient is asked to sign in or join first; after signing in as an eligible member the purchase works.
- On an open hub, a signed-in non-member can join the hub and buy in one step from the invite page.
Managing invites
- The invite list shows each invite’s status (active, used, revoked, or expired) and the bound entry for an “Attendee chooses one” invite.
- Resend an unused invite, or Revoke one to disable its link. You can also bulk resend or revoke the active invites.
- If a ticket type counts toward the event sales cap and the event is already full, you are warned before sending, because invited buyers would still be blocked by the cap until it frees up.
Ticket Price Phases
Use ticket price phases when one ticket type should get more expensive over time without cloning separate ticket tiers.
- When phases are enabled, Phase 1 is the first live price for that ticket type.
- There is no separate base price running before Phase 1.
- If Phase 1 starts in the future, that ticket type shows as coming soon instead of selling at a fallback price.
- Each phase can be free, or at least
£1.00. - Each later phase must start after the previous one.
- Later phases can keep the same price or increase it, but they cannot go down.
- With price phases on, the phases own the start of sales, so that ticket type’s sales window keeps only its optional end. Set an end if you want selling to stop before the event; Phase 1’s start is when selling begins.
- Use clear phase names such as
Early Bird,Standard, orFinal Releaseso buyers understand what changes next.
Ticket Notes
Use Event -> Admin -> Tickets when buyers need more context than the generic checkout policy card.
Event Ticket Notesare the default notes for the whole event.- Use event notes for shared guidance such as arrival details, dress code, ID checks, accessibility info, or house rules that apply across ticket types.
- Each ticket type then chooses one behaviour:
Use event notes: show only the event-wide note.Add ticket note: show the event-wide note first, then extra ticket-specific notes.Override event notes: hide the event-wide note and show only the ticket-specific note.
- Ticket notes support markdown paragraphs and bullet lists.
- Buyers only see these notes after they choose a quantity for that ticket type on a ticket-selection surface.
- The
Reuse from this hubpicker copies a previously used note into the current editor as a starting point. It does not stay linked to the original.
Buyer Limits
Use buyer limits when you want to stop one account from buying too many tickets.
- Set an event-wide buyer cap if you want one buyer to have a total ceiling across the whole event.
- Set a ticket-type buyer cap if only one ticket type needs a stricter limit, such as VIP or early access.
- These limits apply to normal self-serve checkout only.
- Complimentary tickets and staff-issued tickets are not blocked by buyer limits.
- Buyer caps work across all orders, not just one checkout basket.
- Buyer caps follow the original purchaser account, even if tickets are later transferred.
- Hubbaly also has fixed platform checkout limits: up to 10 of one ticket type and 20 tickets total per checkout. These are not event settings.
Discount Codes
Use Event -> Admin -> Tickets -> Discounts when you want to offer a specific ticket discount
without changing the public ticket price.
- Discounts belong to one event. Create a shared code when many buyers can use the same code, or a unique batch when each buyer should receive a one-use code.
- A discount can be percentage based, a fixed amount off the order, or a fixed amount off each eligible ticket.
- Scope a discount to all ticket types or selected ticket types from the discount form. You do not need to edit ticket types just to allow or block a code.
- Buyers can use one code per order, and that one code can discount more than one eligible ticket in the order. For example, a staff discount can apply to the staff member and their partner when both tickets are eligible.
- Optional start/end dates, total redemption limits, and per-buyer limits control when and how often a code can be used.
Copy linkcreates an event link withdiscountCodepre-filled. The buyer still needs to apply the code during checkout so they can see the updated subtotal, discount, and total before paying.- You can pause a discount without affecting tickets already bought. After the first redemption, Hubbaly locks the code value, discount type, and ticket scope so historical refunds and reporting stay stable. You can still rename it, extend the end date, or raise usage limits.
- A 100% discount on paid tickets is still recorded as a checkout order, not a complimentary ticket.
- Refunds are based on what the buyer actually paid after discount. Refunding an order does not free the code usage back up; the code was used and remains counted.
- Review performance from the Tickets discount panel, the Event Admin
Salestab summary, and the finance report/export.
Transfers
Before event start and when policy allows:
- Owner initiates transfer.
- Recipient accepts.
- Ownership updates and transfer history is retained.
- Member-only policy can block transfer if recipient already has an active ticket.
Transfer targeting rules:
Publicticket-access events can be transferred either to an existing eligible account or directly to an email address.- Email-targeted recipients get a secure review link by email, can accept without joining the hub first, and can claim a full account afterward.
- Holding a transferred public-event ticket does not automatically make the recipient a hub member or unlock hub-only features.
Members onlyticket-access events still require transfer to an eligible existing account through the in-app recipient search.
Refund policy note:
- Tickets are dated event access, so buyers should not assume a change-of-mind refund is available.
- If an event is cancelled, moved, rescheduled, or materially changed, direct refund handling follows the organiser’s obligations, Hubbaly platform rules, and payment-provider requirements.
- Refunds always go back to the original purchaser.
- A ticket designated to someone else at checkout can still be requested from the original purchase when it has not been later transferred, but the designated holder must approve before Hubbaly releases the place.
- Pending holder approval does not lock that holder’s pass. The holder can approve the return, keep the ticket, or transfer it before any place is released. If they transfer it first, the approval request is cancelled because the requested holder no longer owns the ticket.
- Once a ticket is transferred after checkout, it must be transferred back to the original purchaser before a self-serve refund can be requested.
- Members plus guests events allow the original purchaser to hold extra guest tickets, so transfer-back should not be blocked just because the purchaser already has one active ticket.
- If a strict members-only event does not allow guest tickets and the original purchaser already has another active ticket for that event, Hubbaly can show
Transfer back blockedbecause moving the ticket back would give that purchaser two active tickets in an event that only allows one member-held ticket per person. - Transfer-back can be blocked by strict members-only holder rules, so some cases need organiser/support handling instead.
- Event Admin standard refunds retain the Hubbaly fee and Stripe processing shown in the refund breakdown.
- Event Admin can also choose a full-refund override when the organiser should absorb those retained fees instead.
Sold-out Waitlist
Use the waitlist when tickets are full and you want to keep a clear order for who gets the next chance.
Waiting
You're in line. No action needed.
Invited
A place opened. You get a timed email invite.
Ticket bought
You buy within the window. You're in.
If an invite expires or is passed on: the place goes to the next person automatically and that request comes off the list. You can also leave the queue at any time.
- People join the waitlist from the event page after tickets sell out.
- Event waitlists are tied to Hubbaly accounts.
- On public event pages, signed-in viewers can join directly and logged-out viewers go through an account handoff before the entry is created.
- For sold-out member tickets on an open hub, the handoff can create the hub membership and the waitlist request together when policy allows.
- If the hub requires published terms before joining, Hubbaly shows those terms first and creates the member-ticket waitlist request only after acceptance.
- Each requested ticket creates its own queue slot. Joining for 2 adds 2 slots, and adding 1 later appends one more slot to the back of the line.
- One buyer can hold up to 20 active waitlist requests per queue.
- The waitlist stays open for as long as ticket sales do, including during the event when an end time is set.
- Buyers can see their queue position when they join and again on the waitlist management page under
Your waitlist requests. - Buyers can remove individual waitlist requests or remove several at once instead of clearing the whole waitlist every time.
- Waitlist joins still respect event-wide and ticket-type buyer caps.
- A successful waitlist join sends a confirmation email. Ask buyers to check junk/spam and mark Hubbaly mail as safe so timed purchase offers are not missed.
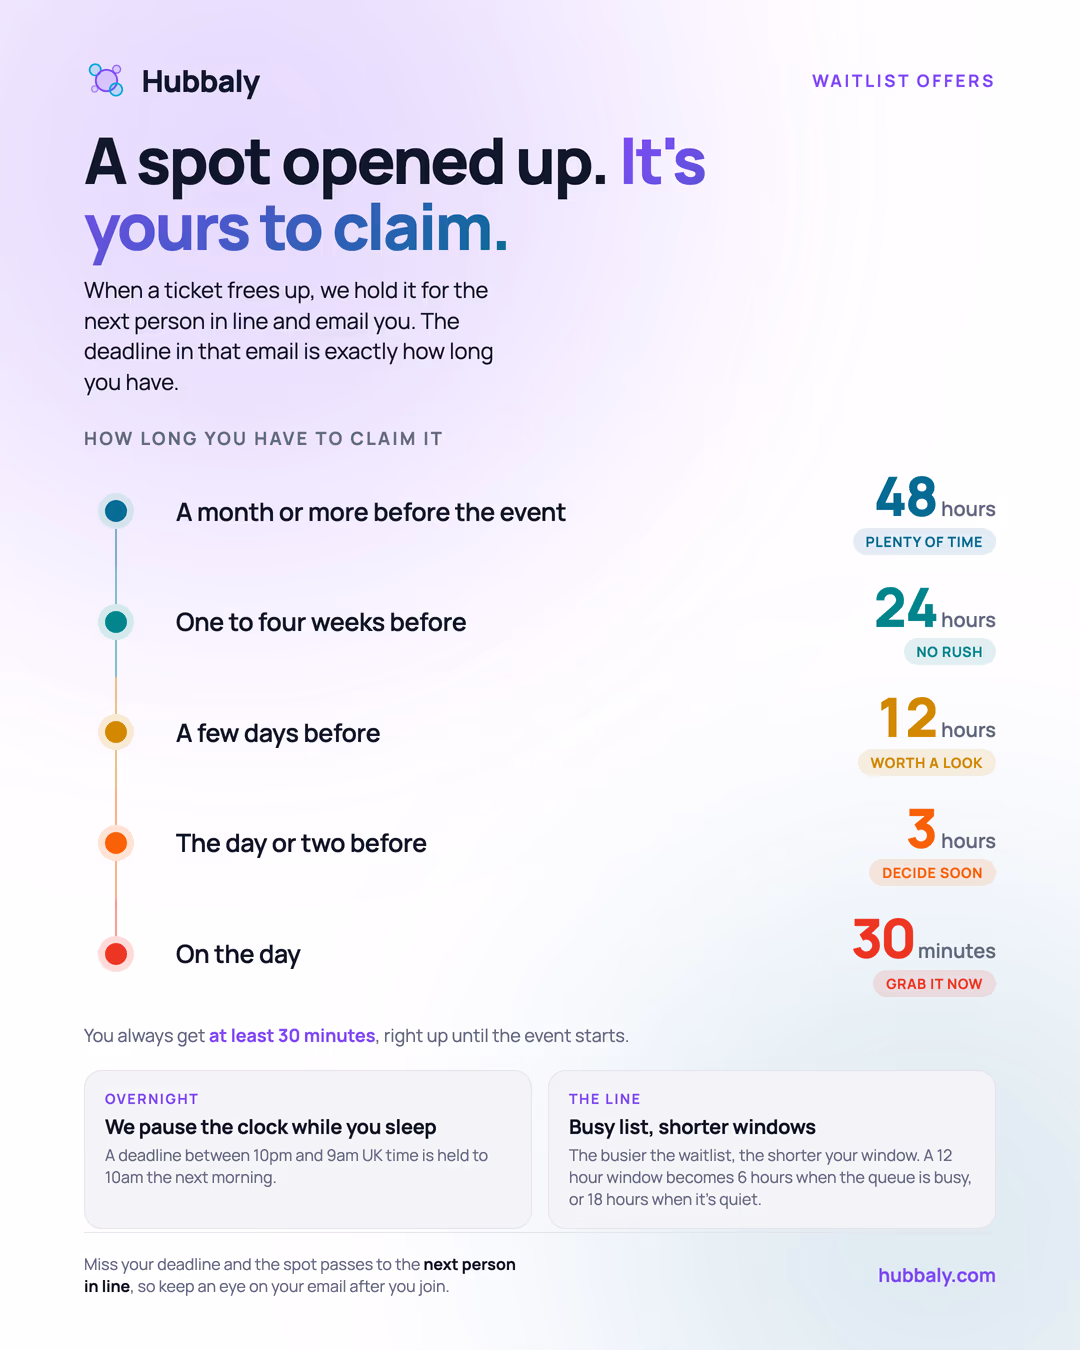
- When a place opens again, Hubbaly automatically offers it to the next people waiting.
- Release notifications tell the buyer they are next in line, include the exact
Purchase bydeadline, and the waitlist management page shows that same deadline while a slot is released. - How long buyers get scales with how far away the event is: roughly 48 hours when the event is a month or more away, about a day at one to four weeks, shorter as it approaches, down to 30 minutes on event day. Quiet queues get a little longer and busy queues a little shorter.
- Deadlines avoid the middle of the night: short windows that would expire overnight roll forward to 10:00 UK time, and no deadline ever lands after ticket sales close.
- A failed checkout (for example a declined card) does not cost the buyer their place while their window is still open; the same offer link keeps working until the deadline.
- The release email and waitlist management page also let the buyer use
Pass to next personif they no longer want those tickets. - If the buyer passes or misses the deadline, that slot moves to the next person in line automatically and the earlier buyer gets a closure message with a rejoin link.
- Places can reopen because stock is added, a checkout hold expires, or a ticket is cancelled/refunded back into normal inventory.
- If an organiser increases ticket capacity after sellout, Hubbaly automatically offers the newly opened seats to the front of the relevant waitlist instead of leaving those buyers stuck waiting.
- The platform only sends new offers for seats that are actually free at that moment. Live checkout reservations still count as held inventory, so a large capacity increase does not over-invite beyond real availability.
- If one ticket type is sold out while another is still on sale, the sold-out ticket type can show its own waitlist entry point without blocking the other ticket type from being purchased.
- The batch size controls how many people get a chance at the same time when places reopen automatically, but a post-sellout capacity increase can promote a larger number when that many newly opened seats are genuinely available.
- You can remove entries if someone no longer wants a place.
Status guide:
- Waiting: the person is still in line.
- Invited: they were offered a place with a timed invite.
- Joined: they completed checkout after being invited.
- Removed: their invite expired, they left the list, or an organiser removed them. The admin queue page shows which of these happened.
Complimentary Tickets
Use complimentary tickets when you want to issue a free place without sending someone through normal checkout.
- Good for staff, VIP guests, media, partners, or promo attendees.
- Search for a current hub member, or type the exact email of someone who already has a Hubbaly account. One action issues the ticket immediately.
- The recipient must already have a Hubbaly account. The search lists current hub members; public ticket types can also go to any existing account by email, while members-only ticket types can only go to current hub members. You cannot comp a brand-new email (someone with no account yet).
- If the event has multiple ticket types, pick which one the comp should mirror (price label, name). For single-type events no choice is needed.
- Comps draw from a hidden per-event Complimentary allocation, not from sale stock. They do not feed the waitlist, and they can be issued even when every ticket type is sold out.
- If the event has a total capacity set and the comp would exceed it, a warning is shown. You can confirm past it; there is no hard block.
- Complimentary tickets are non-transferable by the holder. An admin can reassign a comp to another member if needed.
- The attendee receives a normal ticket and is added to the attendance list.
Ticket Returns and Released Tickets
About Ticket Return requests
If enabled for the event, this optional Hubbaly feature lets eligible paid ticket holders request a conditional return before or after primary availability sells out. It is separate from cancellation or material-change refund rights. The queue protects normal ticket availability, and the replacement buyer receives a newly issued ticket from the organiser only when Hubbaly releases a place.
- Original purchaser starts from Account → Purchases.
- Purchaser-held tickets queue immediately.
- Clean designated-at-checkout tickets ask the current holder to approve before Hubbaly releases the place. The holder receives an in-app notification and email, and the pass remains valid while they decide.
- Once a ticket is queued or holder-approved, the original ticket is locked from transfer/check-in.
- A released ticket hold can then be offered to the waitlist.
- Matching runs with waitlist-first timed offers.
- If a buyer passes or the timed hold expires, Hubbaly offers that slot to the next eligible waitlist buyer before falling back to public checkout.
- The original purchaser’s refund is triggered only after a replacement purchase succeeds (Hubbaly fee and Stripe processing retained under the standard policy).
Important policy notes:
- Refund is not guaranteed until a replacement purchase completes.
- Holder approval is not a refund and not a return request. It is only consent from the attendee currently holding a clean designated-at-checkout ticket.
- Ticket returns are a Hubbaly product feature, not a legal refund obligation.
- Unresolved requests expire when ticket sales close (the event end time for multi-day events).
- Waitlist-first released tickets use the same automatic
You're next in line,Purchase by, andPass to next personflow as the standard sold-out waitlist. - If a released Ticket Return has already matched another buyer and is being held in that buyer’s
checkout, Hubbaly can show
Released ticket held in checkoutinstead of offering the same seat again. - If a timed offer expires, or the current buyer passes, that buyer gets a closure/rejoin message and the slot continues through the next waitlist-or-public fallback step.
REFUND_PENDINGcan persist temporarily when Stripe/Connect settlement requires retry/reconciliation.- Ticket holders usually start this from Account → Purchases, and each live ticket page now includes a shortcut back to the matching purchase row.
- Organisers turn this on per ticket type in Event Admin → Tickets.
Designated Tickets at Checkout
One payer can assign tickets to other members at checkout:
- Payer remains financial source-of-truth,
- Ticket holder and payer can differ,
- Refunds return to original payer,
- Ledger keeps ownership and refund states explicit.
How that changes by ticket-access mode:
Members only: after the buyer’s own ticket, every extra ticket must be assigned to an active hub member before checkout can continue.Members + guests: assigning existing members is optional. Use it when you already know which member should hold a ticket. Any extra tickets you leave unassigned stay on the buyer account for now, which lets a member reserve places for guests on private events without naming them first.Public: people can usually buy directly for themselves instead of relying on member assignment, and signed-out guest checkout is available only when the event is also public-listed.
Critical Event Updates
- Time-change alerts should only be sent for actual time changes.
- Time text should be human-readable.
- Non-time edits should not be labeled as time changes.
Identity verification for events
Identity verification is an advanced capability for selected communities. Use it only when a community sometimes confirms identity in person and needs a reusable trusted state for later events, without storing sensitive ID documents online.
Common organiser use cases:
- Name or ID-style checks at entry,
- Private or trust-sensitive community events,
- Marking someone as known or identified in person so later events can rely on that community-level trusted state.
How it works:
- Hubbaly enables it for a specific community.
- After that, the hub then chooses whether to turn identity verification on.
Hub -> Admin -> Settingsthen chooses whether to turn identity verification on for that hub.- Once the hub enables it, specific events choose whether to use it.
- Members see calmer
Door-check detailswording on member-facing surfaces instead of the system label. - Members can save their legal name and, if useful, an optional private photo from
Hub -> Verification. - Owners/admins, or event staff with
VERIFY_MEMBERS, can review those details or mark someone verified in person. - That verified state belongs to the hub, so future events can reuse it without asking the person to upload sensitive documents.
What is stored:
- Legal name,
- Optional private photo,
- Trusted/reviewed state,
- Review history for who confirmed or revoked it,
- No sensitive ID documents stored online.
Event setting options:
Off: do not use identity verification for this event beyond normal ticket validation.On demand: staff can open identity details after a successful online scan when they need an extra check.Used at door: identity verification is part of the normal door workflow for this event after ticket validation.
Important limits:
- Ticket validation still stays the main event-day step.
- Scanner review only appears after a successful online validation.
- Offline scanning can continue, but identity verification review does not.
- Hub admins can also review or revoke someone’s trusted state from
Hub -> Admin -> Verification. - Communities that have not been enabled by Hubbaly do not see this workflow in normal hub or event admin settings.
Event Day Scanning
Use Event -> Admin -> Scan for live check-in.
- If the event attendance registration is
Manual onlyorOff, theScantab is hidden from navigation. - Owners/admins can still open the disabled scan page from a direct link to confirm why it is unavailable and jump back to settings.
- Managers and staff are redirected to the next visible admin workspace instead of staying on a disabled scanner route.
- Scanner opens in manual mode first so desk teams can search immediately and deliberately switch into camera use when they need it.
Use Camerais the primary scanner action when live scanning is enabled.- Camera mode is best for phone-based QR scanning.
- Manual input/search is useful for desk workflows and hardware scanners.
- For very large events, scanner manual mode becomes search-first instead of showing a passive browse list.
- Offline pack download is available in the scanner wherever offline scanning is enabled, including the app installed from your browser. Keep the scanner page open before losing connectivity: a fresh page load still needs a live connection.
- Offline scanning should be prepared before losing connectivity, not after.
- Review
Recent Scansif someone disputes whether they were checked in. - If the event uses private door-check details, the panel appears only after a successful online validation and only when an operator intentionally reveals it.
- Staff need the separate
VERIFY_MEMBERSpermission to use that panel unless they are already a hubOWNERorADMIN. - Offline scanning can continue, but private door-check review does not.
- Scanner review is one option, not the only one: hub admins can also review members from
Hub -> Admin -> Verification.
Event Day and Attendance Records
Use Event -> Admin -> Event Day for the live roster during the event. After the event, the same workspace relabels to Attendance records for later review.
- If attendance registration is
Off,Event Daystays visible for organisers and other roster-capable roles, but it becomes read-only andScanstays hidden. Event Dayis the place to review checked-in tickets, who is not in yet, blocked arrivals, staff-on-site status, and recent arrivals from one canonical roster.- The main summary answers the door question first: how many tickets are in and how many are still to come.
- The readiness area is an attention panel, not a second attendee list. Before the event it highlights preparation gaps, during the event it becomes
Needs attention, and after the event it becomes attendance follow-up. - Use the attention panel for counts and the first few people who need action; use the roster, filters, search, and scanner for the full participant list.
People to reviewis for actionable work: missing required forms, forms that need re-signing, and post-event feedback follow-up. Refunded, transferred, voided, or replaced tickets stay in summary counts for audit context; they are not listed as people to review.- Roster rows show profile display names first, then
@usernamewhen a display name is blank. Uploaded avatars follow profile-photo visibility rules, including connection-only photos; generated fallback avatars are unique per account. - On larger events,
Event Dayopens search-first with summary, filters, and a small recent-arrivals feed instead of a long passive roster. - Review the policy banner first so operators know what counts as confirmed.
- Use manual confirmation only when it matches the event policy.
- Keep notes short and factual if you manually confirm someone.
Incident Logging and Follow-up
Use Event -> Admin -> Incidents to capture operational problems with an audit trail.
- Report incidents when something operational or safety-relevant happens.
- Apply outcomes only after the facts are clear enough to explain the decision later.
- Use this for durable records, not casual back-and-forth discussion.
Post-Event Reports and Reconciliation
Use Event -> Admin -> Reports after the event to review what happened.
Ticket Summaryshows sales and check-in outcomes.Required Forms Mismatchhighlights readiness/compliance gaps.Payment Reconciliationhelps operators spot ledger or Stripe coverage issues.Incidents & Notesgives a quick operational summary for follow-up and handoff.
Event-Day Quick Checklist
- Scanner operators are assigned and tested.
- Required forms readiness is monitored.
- Staff escalation owner is known.
- Critical update path is ready.
- Incident logging path is verified.
Where to Go Next
- Forms and signer rules: Required Forms and Waivers
- Refund rules and outcomes: Purchases and Refunds
- Event admin governance flow: Community Admin
- Ops templates and handoff packs: Support Playbooks